A journal of an ordinary expat Filipino that documents his struggles and success journey in this website to inspire fellow OFW. That there's always light at the end of the tunnel. Never give up and always believe in GOD.
We have to make changes at two places, and once you setup the custom domain feature of BlogSpot, Google will take care of all traffic migration and you will not lose any traffic.
Add Register domain name to your BlogSpot Blog:
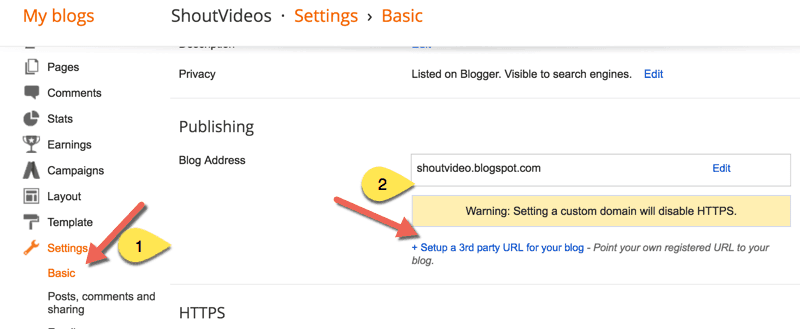
This is the first step where you will be adding the register domain name to your blog. Simply login to your BlogSpot dashboard, and head over to Settings > Basics and you will see an option which says Publishing >Blog address > + Setup a 3rd party URL for your blog:
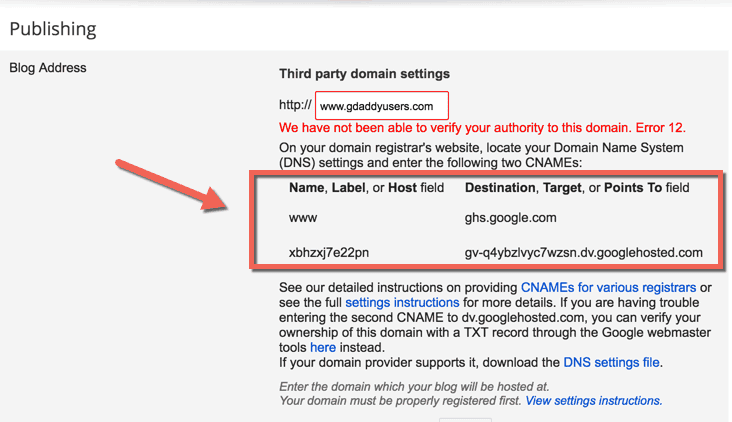
Here you need to add the domain name that you have purchased, and after adding the domain name, it will give two CNAME records and 4 A records which we will be needing in the next step.
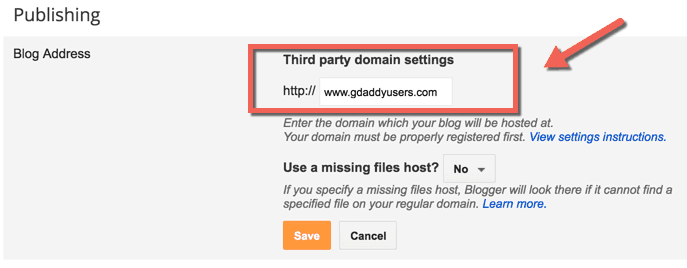
Click on + Setup a 3rd party URL for your blog, and add the domain name which you have purchased.
Note: You need to add domain with www as prefix. (See above screenshot for better understanding)
Once you have added the domain name with www, you will see an error saying “We have not been able to verify your authority to this domain. Error 12..” and you will get the CNAME record that you need to configure (See below screenshot)
Now. once you have these CNAME details, it’s time to login to your domain control panel, and make changes.
Now, follow the next step of this guide and your BlogSpot custom domain name setup will be finished in no-time.
Setting up CNAME and A Record for BlogSpot Custom-Domain Name
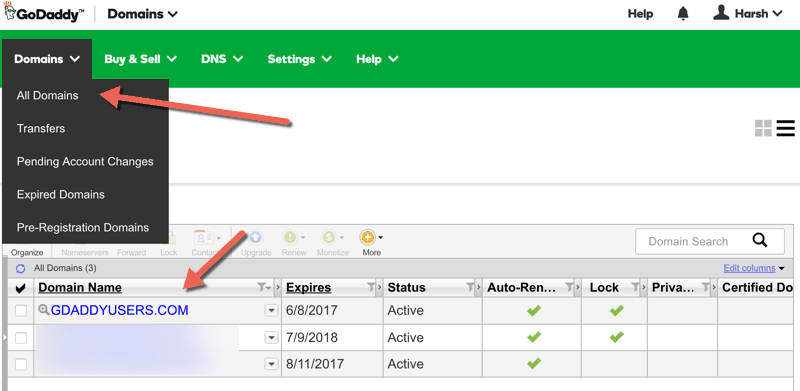
Login to your Godady account dashboard & click on manage domains. You will see a screen like this:
Click on the domain name which you have purchased inside your dashboard, and you will be on Manage domain page.
On the next page, click on DNS zone file to start adding the record.(See below screenshot for the reference)
Click on Add record & from the pop-up select CNAME record & add both the record one by one from your BlogSpot setting screen. Here is both the image to make it easy for you to understand the setup
Adding 1st CNAME record
Click on Add another & copy the second CNAME record from your BlogSpot page:
Adding 2nd CNAME record
Click on finish & on the next page you need to click on Save changes.
. In case if you do, feel free to ask me for help via comments.
Adding A records to your Domain DNS
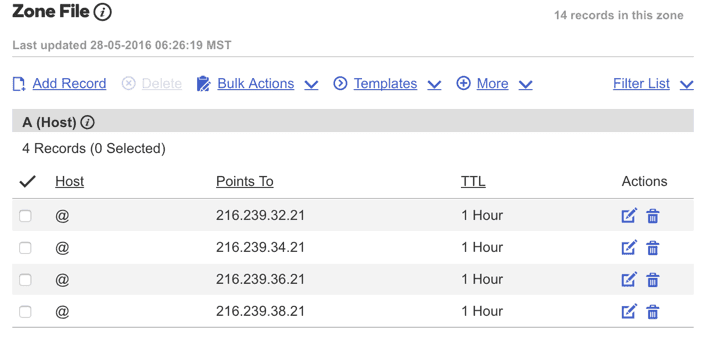
This is the last step where you just need to add 4 I.P. Address into your A record. The process is going to the be the same as above, all you need to do is add A record instead of CNAME. I’m sharing one screenshot which will show you how to add A record, and similarly you can add all 4 A records.
Click on Add record, select A name under record type. In the Hostname part add @ and on Destination IPv4 address add 216.239.34.21
Like this you need to have total 4 A record and your final screen for A record will look like this. Here are the I.P. address of 4 A record which you need to add.
Here is the final screenshot of my A record page on Godaddy:
Now once you have setup CNAME and A record, you need to wait for 5 minutes to 4 hours for this changes to reflect globally. You need to go back to your BlogSpot dashboard, and click on save changes.
If the CNAME & A record has been updated globally, this time instead of showing error “We have not been able to verify your authority to this domain. Error 12.“, your custom domain will start working. In my case, it took only 5 minutes.
If you see error that means, you need to wait for some more hours to add the custom domain name. So, here is the final screenshot which I see:
Once it’s added, Google will take care of redirection part, and anyone if opens your BlogSpot blog address, he/she will be automatically redirected to your new custom domain name.
This will also work seamlessly for internal pages, and you will not lose any traffic or link-juice.
One last thing:
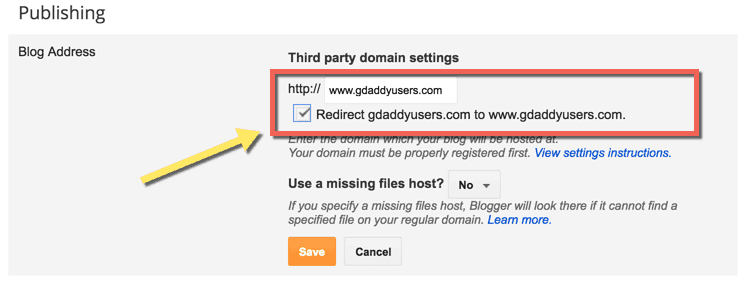
Also, you need to click on Edit here, and redirect non www version of your domain to www. Simply click on Edit and check the options which says “Redirect xxxx.com to www.xxxx.com”
The whole process may look technical, but once you are inside the dashboard and follow all the steps mentioned above, it will be easier for you to implement.
If you have been blogging on BlogSpot platform for a while or for long time and not using BlogSpot custom domain feature, I highly recommend you to start using it for better branding and to make your blog look more professional.
If you are stuck anywhere in the process and need some help, feel free to visit my portfolio site:https://www.box102.xyz/






Comments
Post a Comment